Table of Contents
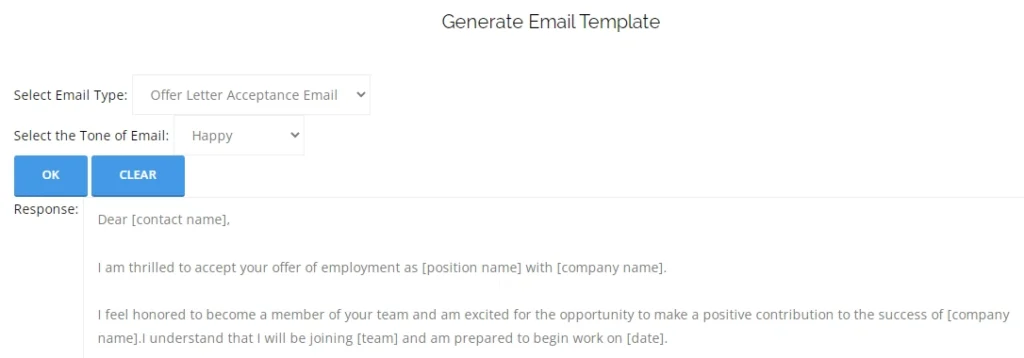
In today’s fast-paced digital world, effective communication through email is crucial. Whether it’s for professional purposes or casual conversations, having well-crafted email templates can save time and ensure consistent messaging. In this blog post, we will explore the process of creating a web page on a WordPress website that empowers users to generate personalized email templates based on their input using OpenAI API. By leveraging HTML, JavaScript, and the powerful OpenAI API, we can provide users with a seamless experience in creating emails for various purposes. In this blog post, I am thrilled to share with you the dynamic email template generator I have already created on a WordPress website. You can explore the code and screenshots of the project below.

Setting up the Development Environment
Before diving into the technical details, let’s set up our development environment. Start by installing WordPress and creating a custom page template for our email template generator. Additionally, make sure to have a reliable code editor at your disposal for efficient development.
Designing the User Interface
The success of any web application lies in its user interface. Designing an intuitive and visually appealing UI is paramount. Create a user-friendly layout that incorporates dropdown menus for selecting the type of email (formal, informal, etc.) and the desired tone (happy, diplomatic, sad). These options will allow users to customize their email templates according to their specific needs. Remember, a clean and well-organized design enhances user experience.
In this example, I did not spend too much time on the user interface, as I wanted to finish it soon and have a working piece of code first.
Implementing the Dynamic Behavior
Now, let’s implement the dynamic behavior of our email template generator using JavaScript. By employing event listeners, we can capture user input and trigger actions accordingly. Create functions that respond to user selections and generate the appropriate email template based on the chosen options.

Leveraging the OpenAI API
To make our email template generator even more powerful, we’ll integrate the OpenAI API. This API allows us to generate natural language text content based on user selections. With OpenAI’s advanced language models, we can provide users with well-structured and contextually appropriate email templates. Explain how to make API requests and handle the responses to seamlessly incorporate OpenAI’s language generation capabilities into our web page.
Testing and Refinement
Thoroughly test the functionality of the email template generator to ensure a smooth user experience. Pay attention to potential challenges or bugs that may arise during the development process and address them accordingly. Iteratively refine the generator based on user feedback, making necessary adjustments to enhance its performance and usability.
Deployment and Deployment Considerations
Once the email template generator is ready, it’s time to deploy it on a live WordPress website. Walk readers through the deployment process, ensuring they have a fully functional tool at their fingertips. Discuss important considerations such as optimizing performance, ensuring cross-browser compatibility, and implementing responsive design for a seamless experience across various devices.

Click to know more about the above product from a Chatbot
Code
HTML
<script src="https://cdn.jsdelivr.net/npm/axios/dist/axios.min.js"></script>
<script src="script.js"></script>
<style>
  /* CSS styles omitted for brevity */

  /* Style for full-size textarea */
  .response-output {
    width: 90%;
    height: 70vh;
  }
</style>
<div class="container">
  <div class="form-group">
    <label for="prompt-input">Select Email Type:</label>
    <select id="prompt-input">
      <option value="Write a detailed formal Email">Formal Email</option>
      <option value="Write a detailed informal Email">Informal Email</option>
      <option value="Write a detailed thank you email">Thank You Email</option>
      <option value="Write a detailed apology email">Apology Email</option>
      <option value="Write a detailed invitation email">Invitation Email</option>
      <option value="write a detailed followup email">Follow-up Email</option>
      <option value="Write a detailed sales/marketing email">Sales/Marketing Email</option>
      <option value="Write a detailed feedback email">Feedback Email</option>
    <option value="Write a detailed Resignation email">Resignation Email</option>
    <option value="Write a detailed offer letter acceptance email">Offer Letter Acceptance Email</option>
    <option value="Write a detailed email complaining to your boss about work life balance">
Work life Balance Email</option>
   <option value="write a detailed email requesting for leave">Leave Request Email</option>
    </select>

<div class="form-group-2">
  <label for="prompt-input-2">Select the Tone of Email:</label>
  <select id="prompt-input-2">
  <option value=" in a normal tone.">Normal</option>
    <option value=" in an angry tone.">Angry</option>
    <option value=" in a happy tone.">Happy</option>
    <option value=" in a sad tone.">Sad</option>
    <option value=" in a diplomatic tone.">Diplomatic</option>
    <option value=" in a complaining tone.">Complaining</option>
    <option value=" in a sarcastic tone.">Sarcastic</option>
    <option value=" in an appreciative tone.">Appreciative</option>
  </select>
</div>

  </div>
  <div class="form-group">
    <button id="ok-button">OK</button>
    <button id="clear-button">Clear</button>
  </div>
  <div class="form-group">
    <label for="response-output">Response:</label>
    <textarea id="response-output" class="response-output" ></textarea>
  </div>
</div>

<script>
  // JavaScript code to clear the text area
  document.getElementById("clear-button").addEventListener("click", function() {
    document.getElementById("response-output").value = "";
  });
</script>
<script src="script.js"></script>
Javascript
document.addEventListener('DOMContentLoaded', function () {
  var promptInput = document.getElementById('prompt-input');
  var promptInput2 = document.getElementById('prompt-input-2');
  var okButton = document.getElementById('ok-button');
  var responseOutput = document.getElementById('response-output');

  if (!promptInput || !promptInput2 || !okButton || !responseOutput) {
    console.error('Required HTML elements not found. Check the IDs of the input fields and buttons.');
    return;
  }

    okButton.addEventListener('click', function () {
    var prompt = promptInput.value;
    var prompt2 = promptInput2.value;
    var fullPrompt = prompt + prompt2;
    var maxTokens = 1000;
    var maxTemp = 1;

    var headers = {
      'Content-Type': 'application/json',
      'Authorization': 'YOUR API KEY' // Replace with your actual API key
    };

    var data = {
      'prompt': fullPrompt,
      'max_tokens': maxTokens,
      'temperature': maxTemp
    };

    axios.post('https://api.openai.com/v1/engines/text-davinci-003/completions', data, { headers })
      .then(response => {
        var completion = response.data.choices[0].text;
        displayResponse(completion); // Call the displayResponse function
      })
      .catch(error => {
        console.error('Error:', error);
      });
  });

  function displayResponse(response) {
    responseOutput.text = response.trim(); // Trim leading/trailing spaces

  }


});
Add code to Functions.php
function enqueue_openai_scripts() {
  wp_enqueue_script('axios', 'https://cdn.jsdelivr.net/npm/axios/dist/axios.min.js', array(), '1.0', true);

  wp_enqueue_script( 'openai-custom', get_template_directory_uri() . 'script.js', array(), '1.0', true );

}
add_action('wp_enqueue_scripts', 'enqueue_openai_scripts');
Screenshot

Conclusion
Creating a dynamic email template generator with the power of OpenAI API on a WordPress website opens up endless possibilities for streamlining communication. By following the steps outlined in this blog post, you can empower users to generate personalized email templates based on their specific needs. Utilize the flexibility of HTML, JavaScript, and the OpenAI API to enhance the functionality of your web page, ultimately saving time and effort in email composition. Experiment, gather feedback, and continue refining your email template generator to deliver an exceptional user experience.
Link to this project: https://techhorizoncity.com/generate-email/
Further Reading: https://techhorizoncity.com/openai-api-integration/

